What Is in the Box#
Your Dinevate onboarding kit includes:
- Tablet: Your Order Manager device for receiving and managing orders.
- Tablet stand with NFC: Customers can tap their phone on the stand or scan its QR code to open your ordering website.
- Charging cable: Keep the tablet connected to power during service.
- Business cards with a QR code: Give customers a link to your restaurant's ordering website.
Place the stand near your register where customers can see it. Keep business cards near the packing area and add one to each takeout or delivery bag so customers know how to order directly next time.
Turning On the Tablet#
- Find the power button along the tablet's edge.
- Press and hold it until the screen lights up.
- Wait for the home screen to appear, and connect the charging cable.
Connecting to Wi-Fi#
The tablet needs a working internet connection to receive new online orders.
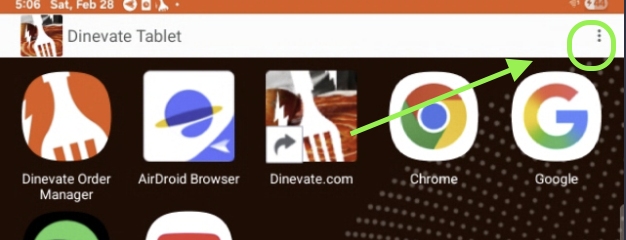
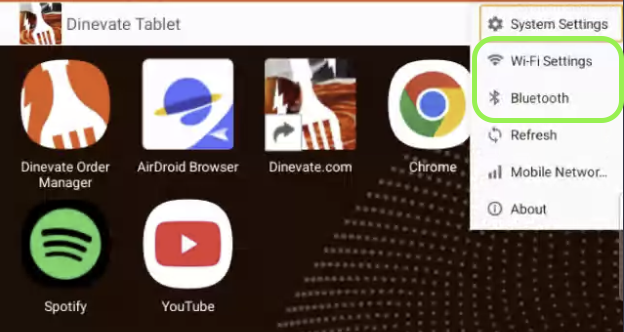
On a supplied tablet with the Dinevate Tablet home screen shown below:
- Tap the three dots in the top-right corner.
- Tap Wi-Fi Settings.
- Choose your restaurant's Wi-Fi network.
- Enter its password and connect.
If your tablet has a different home screen, open the tablet's Settings app and find its Wi-Fi controls. These are tablet settings, separate from Settings inside Order Manager.
A Wi-Fi symbol alone does not prove the internet is working. For a missing order, follow When an order is missing.
Pairing a Bluetooth Printer#
For a Bluetooth printer, pair it with the tablet before adding it in Order Manager:
- Turn on the printer and put it into pairing mode using its manufacturer's instructions.
- On the supplied tablet's three-dot menu, tap Bluetooth. On other tablets, open Bluetooth in the tablet's Settings app.
- Turn Bluetooth on, select your printer and complete pairing.
- If a pairing code is requested, use the code in the printer's instructions.
Pairing alone does not finish setup. Follow Connecting a printer below to test it and choose what it prints.
Opening Order Manager and Signing In#
- Open Dinevate Order Manager from the tablet's home screen.
- Enter your restaurant account's Email address and Password.
- Tap Sign in.
- If you have more than one location, choose the restaurant this tablet will manage.
Remember password is optional. Use it only on a dedicated restaurant tablet.
Forgot Your Password?#
Tap Forgot password? for help. On your phone, open dinevate.com, choose Owner Login, then Forgot password. Follow the reset instructions and return to the tablet to sign in.
Getting Around: Home#
Home uses cards. Swipe to see more destinations:
- Order list: Find and manage incoming and existing orders.
- Menu: Manage available menu items.
- Settings: Configure orders, printers and restaurant settings.
- Support: Get help through the Support Center.
Available controls depend on your restaurant's services and your access. If an action is locked, ask the restaurant owner for help.
Open Settings and use Search settings to find a control by name, such as printer, logo or hours. See Find a setting for the full directory.
Your Order List#
Open Order list from Home. The available tabs include:
- New: Orders still waiting to be accepted.
- In progress: Accepted orders being handled by your restaurant.
- Scheduled: Orders placed for a future time. Check the promised time before preparing them.
- Completed (or Closed, if that label appears): Completed and canceled orders.
An accepted future order can still display Scheduled until its kitchen preparation time.
Use search, Filters and the sort control to find an order. Filters can narrow the list by order type, source or payment method. Tap an order to open its details and review the items, instructions, promised time and payment information.
How to Accept an Order#
When an order needs your attention, the tablet shows a new-order alert. If automatic acceptance is off, the order stays in New until someone accepts it.
- Open the order from Order list → New.
- Review every item, special instruction, pickup or delivery detail, and payment status.
- For an ASAP order, use the − and + preparation-time controls to choose a realistic number of minutes.
- Tap Confirm order.
- Check that the order is accepted. ASAP orders display In progress; future orders can continue to display Scheduled.
For an ASAP order of $100 or more, a Large order confirmation asks you to check the preparation time. Adjust it if needed, then tap Confirm. These orders always need this manual review, even when automatic acceptance is on.
If Automatically print accepted orders is on and a printer is configured, acceptance can also trigger printing. Otherwise, use Print in the order details. Acceptance and printing have separate settings.
Automatically Accept Orders#
- From Home, open Settings → Order behavior.
- Under Incoming orders, turn on Automatically accept orders.
- Return to Order list and confirm your restaurant is ready to handle incoming orders.
Automatic acceptance uses the configured preparation time and requires permission to accept orders. Large ASAP orders still need manual review. Keep checking the tablet for orders that need attention.
To print automatically as well, open Settings → Printers & receipts → Automatic printing and turn on Automatically print accepted orders. Set up and test the printer first.
See Automatically accept orders for the complete workflow.
When an Order Is Missing#
- Confirm the tablet is signed in to the correct restaurant.
- Open Order list, clear any search or filters, and check New, In progress and Scheduled. An automatically accepted order may already be in progress.
- Check the tablet's internet connection and any on-screen connection or sign-in message.
- Pull down on the order list to refresh it. Follow When an order is missing for the remaining checks.
If it is still missing, open Support from Home and include the restaurant location, order number and approximate order time. Do not create or charge a replacement order just because the original is not visible.
How to Complete an Order#
- Open the accepted order from In progress.
- Confirm the food has been handed to the customer or the appropriate delivery driver.
- Tap Complete order and wait for confirmation.
- Find the completed order under Completed, or Closed if that label appears.
For Dinevate orders, the completion action also emails the customer. Delivery tracking and the driver's progress are shown separately from your kitchen's completion step.
Delivery Orders#
Review the delivery details in the order before preparing it. Accept the order with enough preparation time for your kitchen.
Dinevate Delivery#
Check the Dinevate Delivery card for the delivery request and driver status. If you need to request delivery and the action is available, choose Request Dinevate Delivery, review the fee shown and confirm. A request needs a successful result before you can rely on a driver being assigned.
Prepare and package the food, then hand it to the assigned driver. Follow the order's completion action when it leaves your restaurant.
Your Own Drivers#
If your restaurant uses its own delivery team and you have delivery access, use Assign Driver in the order details. Choose the correct driver and check the assignment result. The driver can use their delivery workflow to update the trip and customer tracking.
How to Reject an Order#
Reject an order only when you cannot fulfill it. If an item is unavailable, also update its menu availability so another customer does not order it.
- Open the new or accepted order.
- Tap Reject.
- Read the confirmation and tap Yes if you want to stop it.
- Check that its status changes to Canceled. It appears with the closed or completed orders.
Rejecting does not refund the customer. For an eligible card order, the refund window may open after rejection if you have refund permission. Review and submit the refund separately; simply closing that window does not return the payment.
How to Process a Refund#
With refund access, you can refund an eligible order on the tablet:
- Open the accepted, completed or canceled order and tap Refund.
- Check Available to refund, enter the Refund amount and choose a Refund reason.
- Tap Process full refund or Process partial refund, as shown.
- Use Cancel refund during the five-second countdown if needed. Once processing starts, keep the window open and wait for the result.
A successful refund is recorded on the order and the customer is emailed. If the result is unclear, check the order or contact Support before trying again. See Cancel or Refund an Order for details.
Adding an Upcharge#
With upcharge access, open an eligible accepted or completed Dinevate online card order and tap Upcharge.
- Select the exact item or items. Read their options and notes, especially if the same menu item appears more than once.
- Tap Continue and enter an additional amount and reason for each selected item.
- Tap Review upcharge and check the selected items and combined amount. The combined limit is $15.
- Tap Charge with the amount shown and wait for the result.
A confirmed upcharge appears on the affected item. If a payment link is required, use Share payment link and wait for payment confirmation. If the result needs checking, do not submit another charge for the same items.
See Upcharge items for the full walkthrough, including repeated menu items and payment results.
Connecting a Printer#
Open Settings → Printers & receipts → Printers & station routing. This opens a full-screen printer workspace. Tap Add printer to connect another printer. You can also start from Settings → Device Management → Add printer.
Set Up and Test the Printer#
- Choose Wi-Fi / Ethernet, Bluetooth or USB cable, matching the printer's connection.
- Select the correct Printer brand, such as Star Micronics or Epson. Other compatible receipt printers are supported where shown.
- For network printing, keep the printer and tablet on the same network. For Bluetooth, pair the printer in tablet settings first. For USB, connect the cable and allow access when prompted.
- Use Search for printers, or enter the network or Bluetooth address when that option is available. Choose the correct printer.
- Tap Print test once. Check the paper at that printer.
- If the receipt is readable and came from the correct printer, tap Yes, printed correctly. If it did not, choose No, something is wrong and check the connection, paper and cover before trying again.
- Choose the printer's name, Print tasks and Copies per task.
- Tap Save printer and check the saved result.
Printer connections and their print tasks are saved for this tablet.
For Epson hardware instructions, see Epson TM-m30 / TM-m10 Bluetooth setup.
Stations and Kitchen Tickets#
Stations send the right items to each preparation area. Open Settings → Printers & receipts → Stations.
The default station receives items that no other station claims. Add another station for a preparation area such as Pizza or Bar:
- Tap Add station and enter its Station name.
- Choose Choose menu items for an exact list, or Match keywords for automatic matching.
- Review the items that will be sent there, then save with Add station or Save station.
- Select which of this tablet's printers should print the station's tickets.
- Check Which printer prints what to confirm the routing.
Keyword matching can use an item's name, section, modifier or selected option. The two routing methods are alternatives: changing methods removes the previous method's draft rules. Use Choose menu items when you need a fixed list.
Station names and item rules are shared by the restaurant. Printer assignments belong to this tablet. Check every tablet that prints tickets.
Order and Receipt Settings#
Order behavior and printing are in separate Settings groups. Use Search settings if you cannot find a control.
Settings → Order behavior#
- Automatically accept orders: Under Incoming orders. See Automatically accept orders above for setup and manual-review exceptions.
- Scheduled order reminders: Under Scheduled orders. Reminds staff about upcoming accepted scheduled orders.
- Scheduled print lead (minutes): Choose 0, 15, 30, 60 or 120. A positive value can hold an automatically accepted future order's ticket until that many minutes before its preparation time. A value of 0 does not apply this hold. This does not change the customer's promised time or turn on automatic printing.
Settings → Printers & receipts#
Under Automatic printing:
- Automatically print accepted orders: Prints configured tickets when orders are accepted.
- Print upcharge receipt: Controls printing after an upcharge.
Under Receipt content:
- Print restaurant logo and Print ordering QR code
- Show section names
- Show modifier group names
- Show other station items
- Receipt text: Small, medium or large
Choose the settings that fit your service, then check a real ticket. See Find a setting for other device and restaurant controls.
Managing Restaurant Status and Hours#
Open Settings → Restaurant for online ordering, weekly hours and special hours. Review the saved state before making a change, and check the result afterward.
Managing Your Menu and Ordering Settings#
Open Menu on Home for tablet menu controls, including item availability. Your Merchant Dashboard also provides the full menu and online ordering settings.
- Managing Your Menu covers items, prices, sections, photos and modifiers.
- Ordering Settings covers pickup, delivery, scheduling and other online ordering options.
Connecting Your Own Domain#
If you already own a domain such as myrestaurant.com, you can connect it to your Dinevate website. If Dinevate bought and set up your domain for you, it may already be connected.
Follow Connect Your Domain to Dinevate for the setup steps.
Getting Help#
Open Support from Home to use the Support Center. You can also open the Support Center in your Merchant Dashboard on dinevate.com.
When creating a case, include your restaurant location, what you were trying to do, the message shown on the tablet, and the order number if an order is involved. For a printer issue, include the printer model and whether it uses Bluetooth, network or USB.
Submit the case and check that it was created. Return to the Support Center to read replies and continue the conversation.